
In the two previous posts, I took you through getting started with Ansible and Infoblox. We are now going to look at tying those together with “nios_next_network”. We will learn to lookup single and multiple networks at the same time and create them as well. Previous posts: Ansible and Infoblox Getting Started Ansible and Infoblox “lookup”
Our first step is creating a “Network Container” in NIOS (Network Identity Operating System). Yes, we are going to need to do this manually. The “infoblox-client” looks for a “Network Container” when making the API call. We will create a new “Container” 10.10.0.0 using the CIDR (Classless Inter-Domain Routing) “/16” 10.10.0.0/16. This will be our network for the rest of the playbooks in this series.
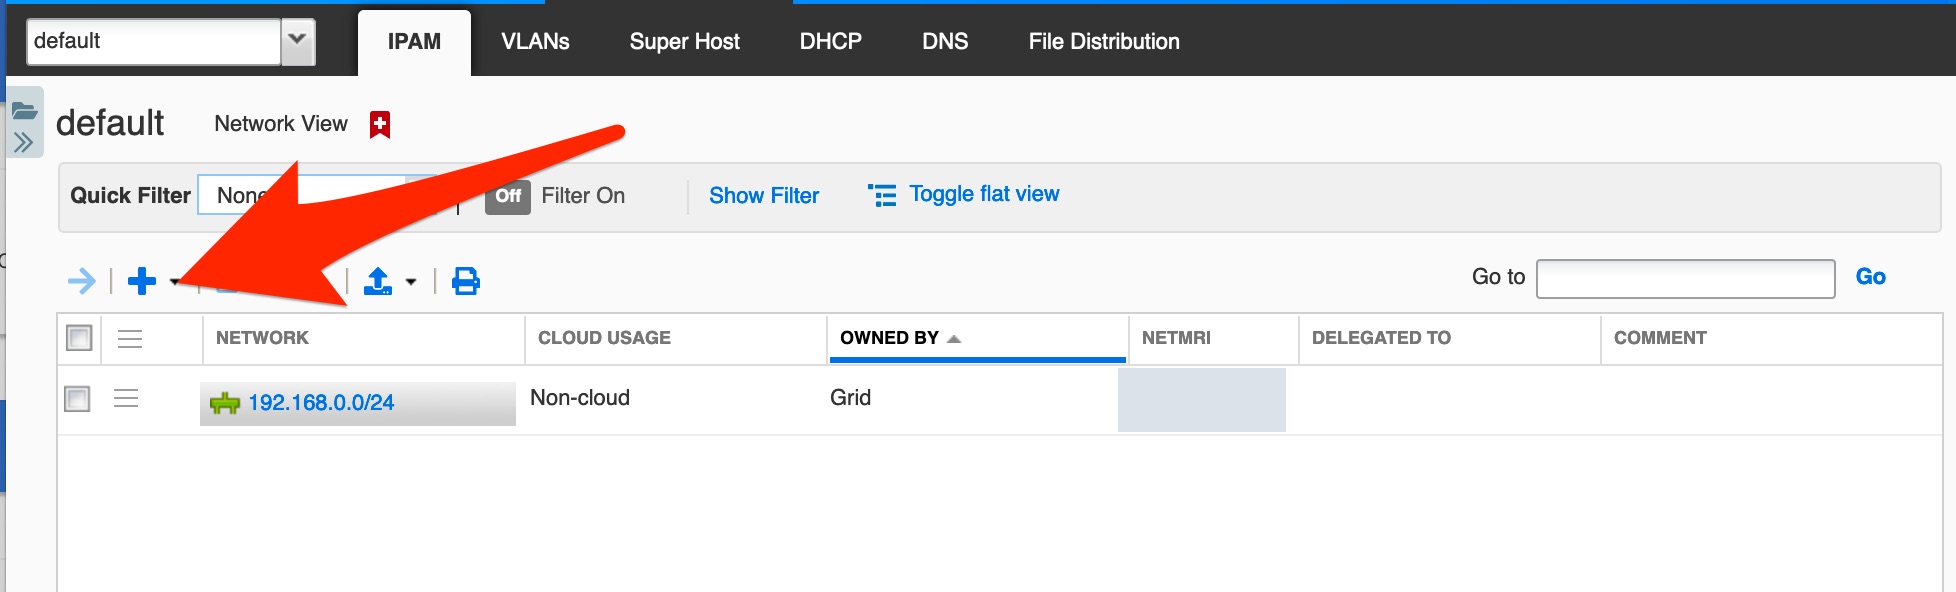
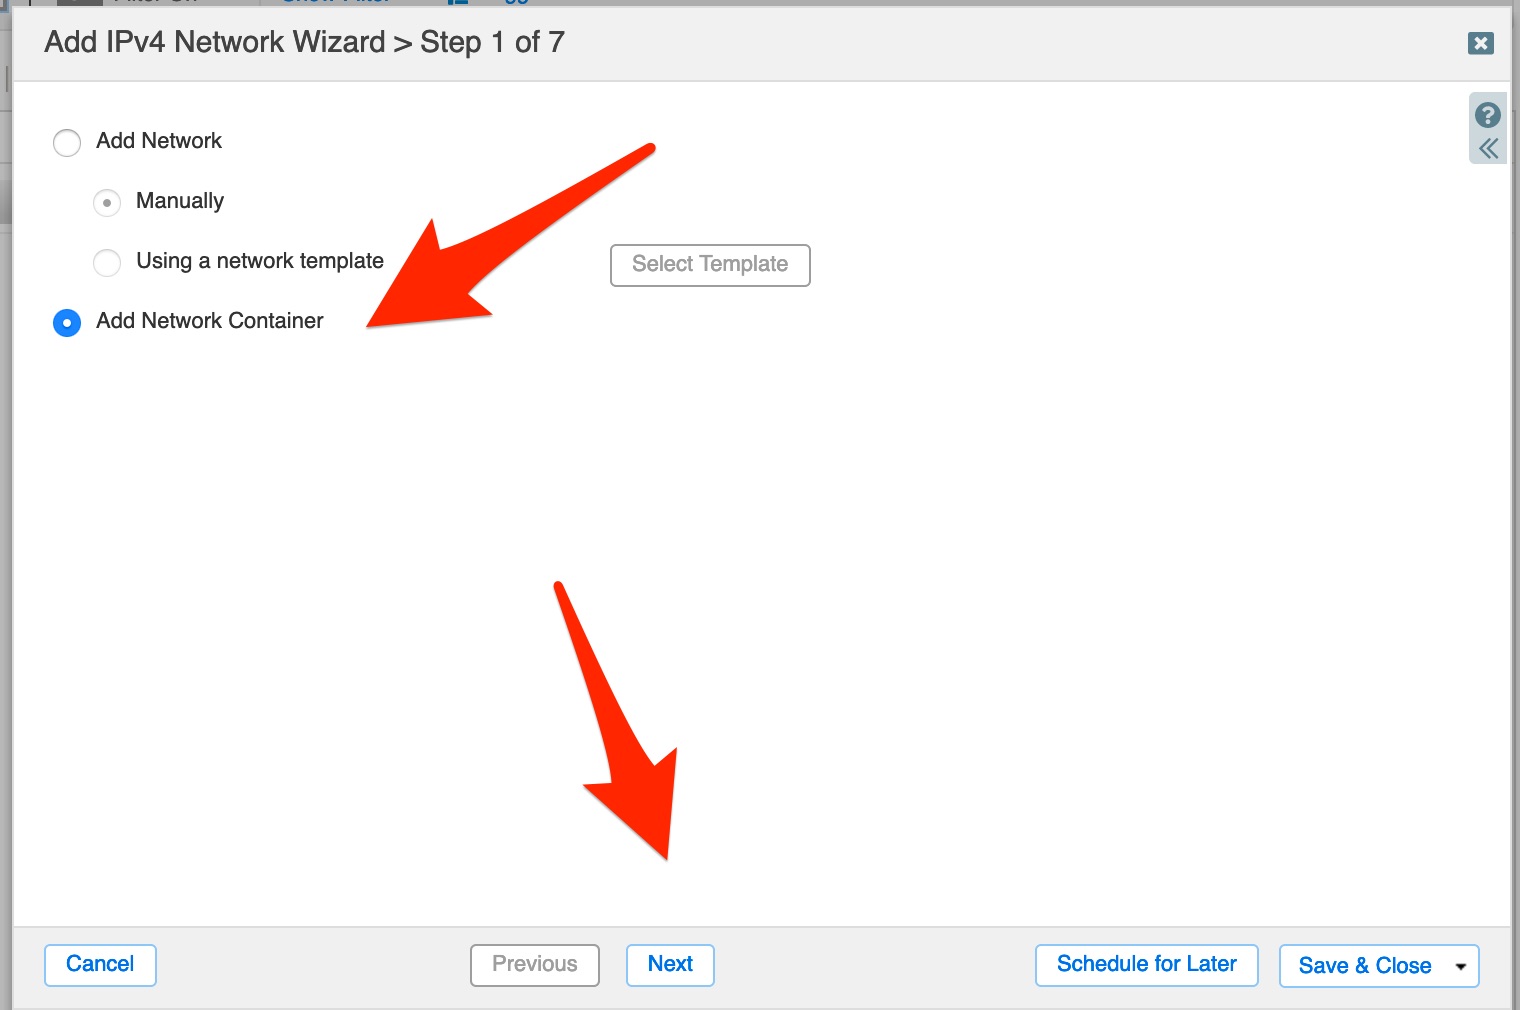
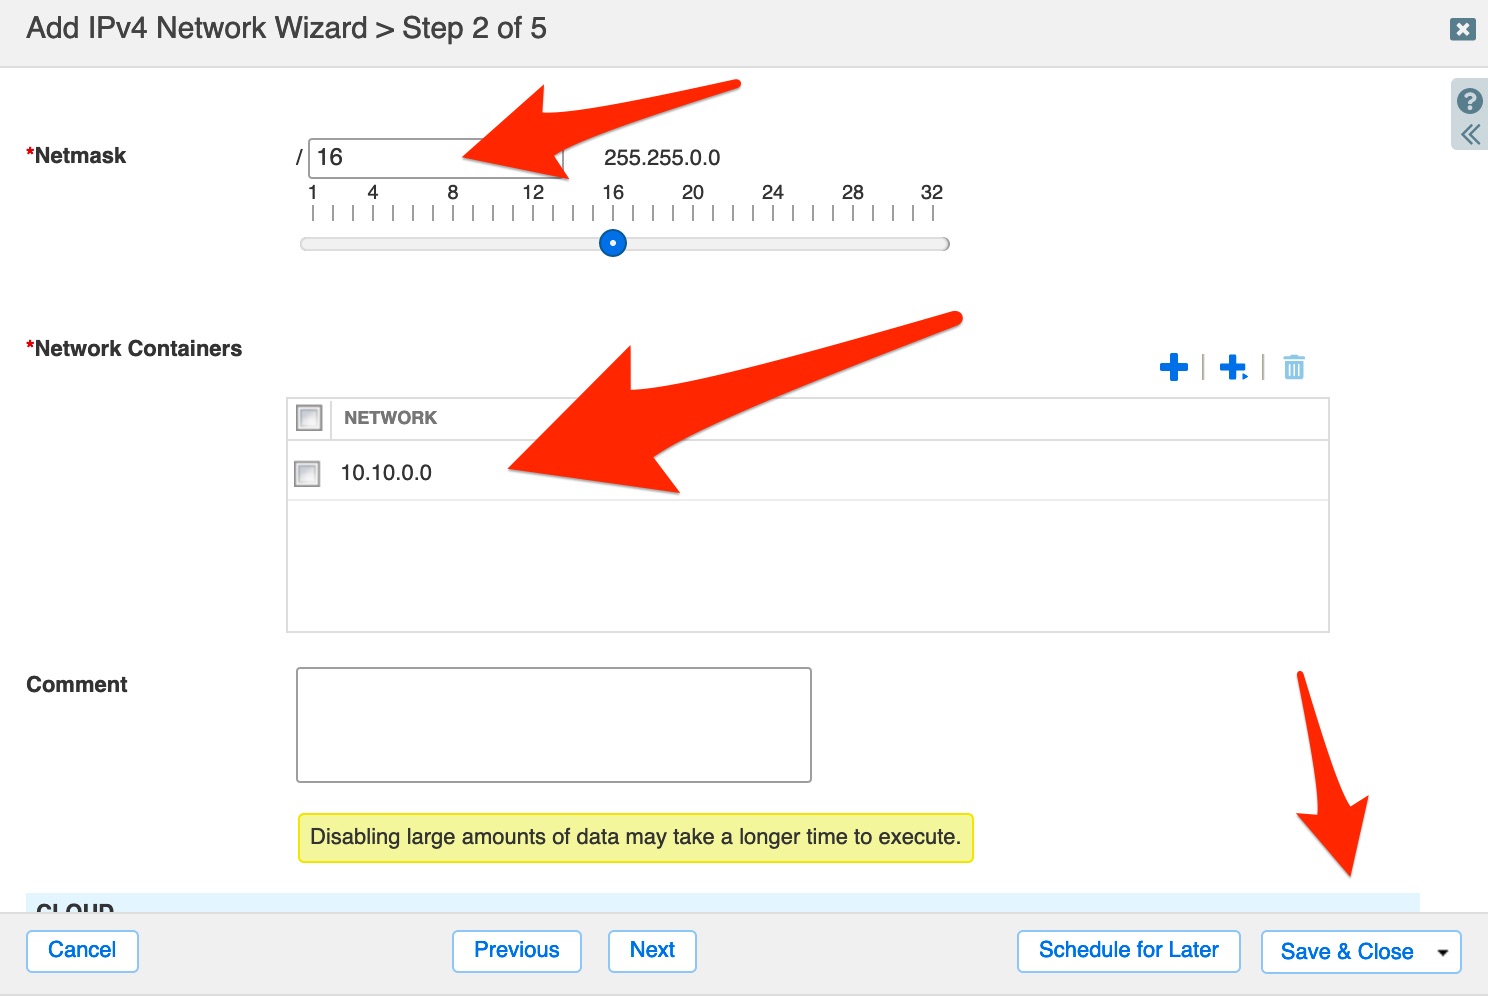
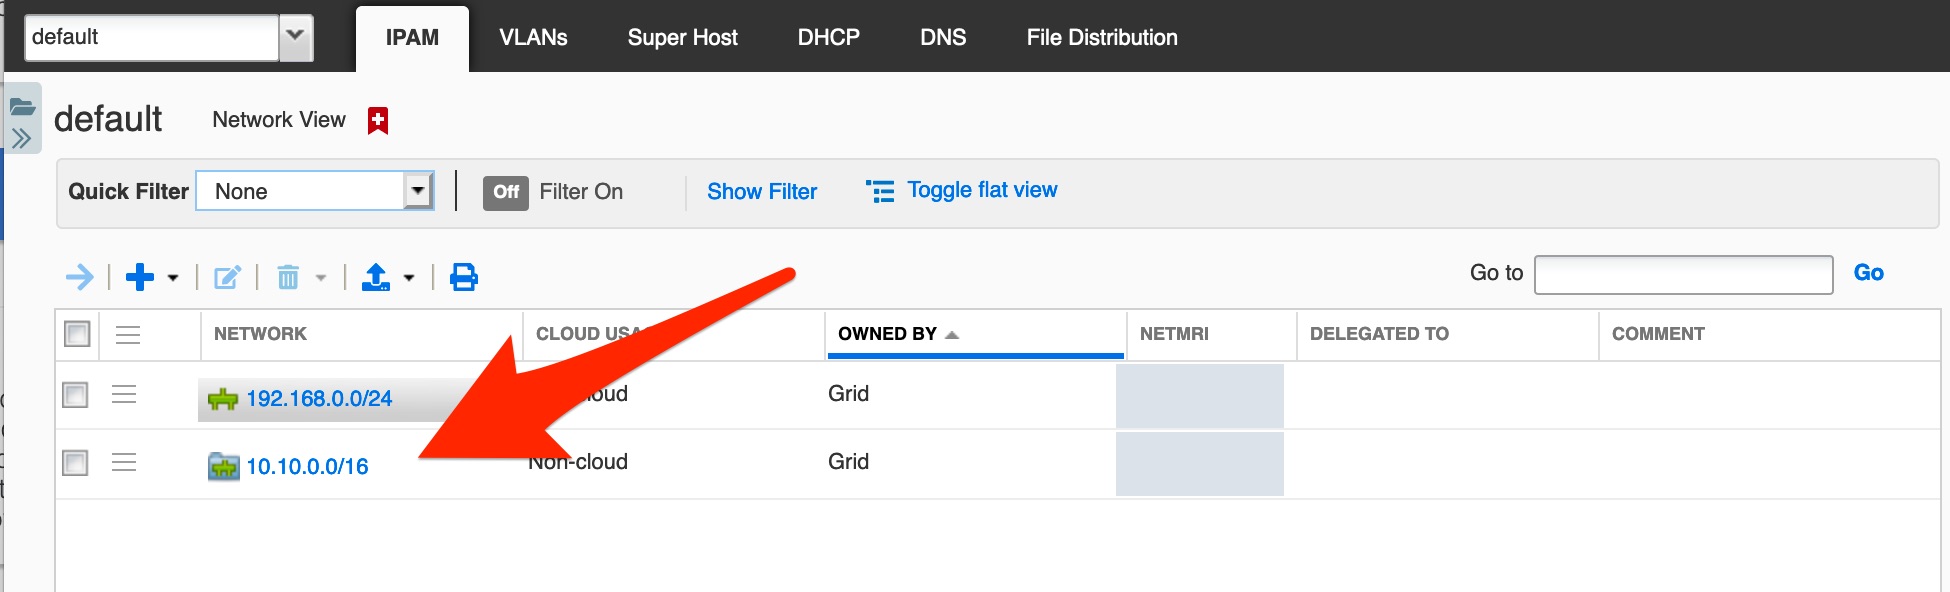
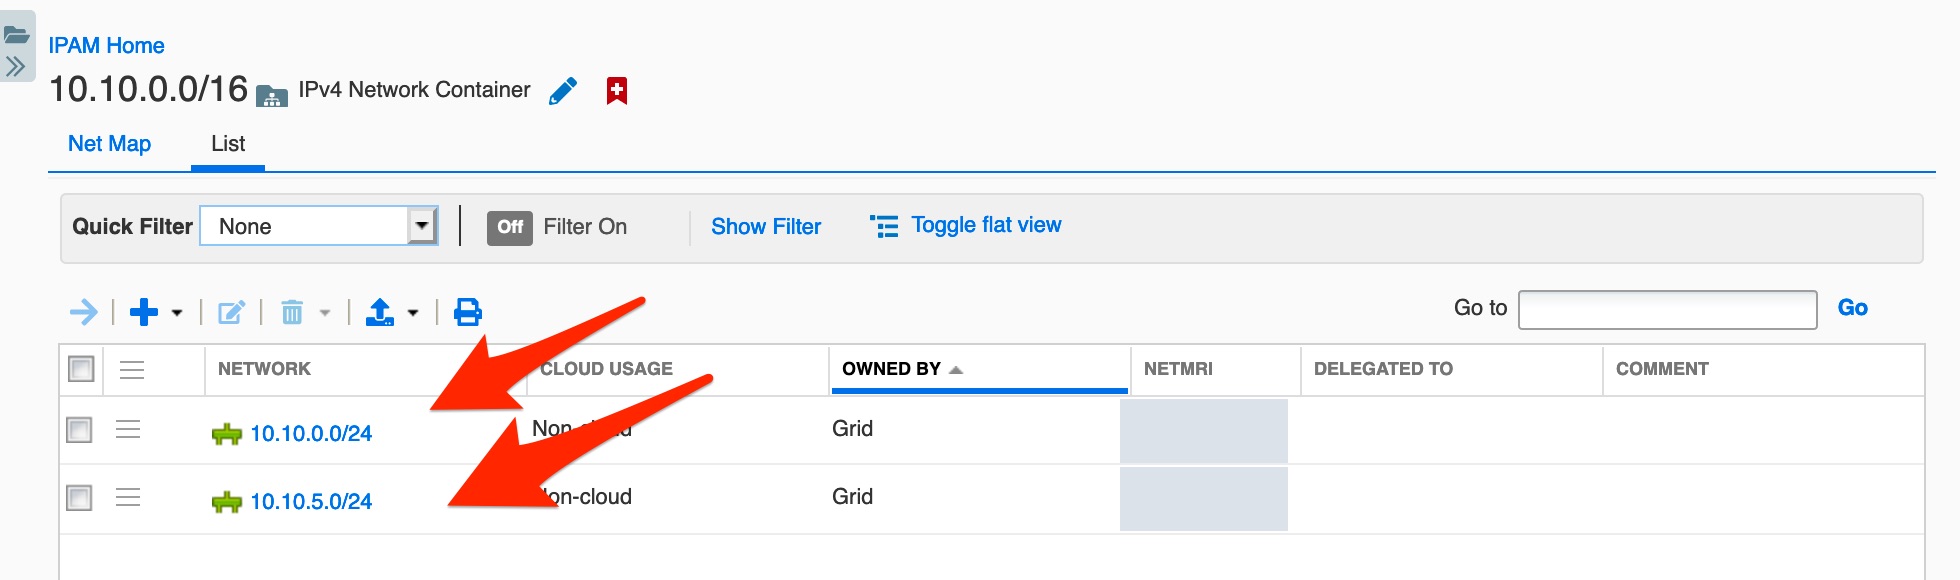
First, we need to add a few networks in the UI. Let’s start with 10.10.0.0/24 and 10.10.5.0/24, to show us how the API call will work in a semi-real life scenario.
How Do You Use nios_next_network to Find the Next Available Network?
Let’s create our first playbook to find out what’s the “Next Available Network” we can use via Ansible. We’ll call it “lk_next_network.yml”. This will use the “lookup” with “nios_next_network”:
---
- hosts: nios
  connection: local
  tasks:
    - name: return the next available network for network 10.10.0.0/16
      set_fact:
        networkaddr: "{{ lookup('nios_next_network', '10.10.0.0/16', cidr=24, provider=nios_provider) }}"
        provider: "{{nios_provider}}"
    - name: check the networkviews
      debug:
        var: networkaddr
Run the playbook and see what it returned:
$ ap lk_next_network.yml

PLAY [nios] *****************************************************************************************************************

TASK [Gathering Facts] ******************************************************************************************************
ok: [192.168.0.200]

TASK [return the next available network for network 10.10.0.0/16] ***********************************************************
ok: [192.168.0.200]

TASK [check the networkviews] ***********************************************************************************************
ok: [192.168.0.200] => {
    "networkaddr": [
        "10.10.1.0/24"
    ]
}

PLAY RECAP ******************************************************************************************************************
192.168.0.200              : ok=3    changed=0    unreachable=0    failed=0    skipped=0    rescued=0    ignored=0
You are probably wondering why it showing me “10.10.1.0/24” instead of “10.10.0.0/24”. That’s because we created in the UI. I wanted to give you an example of what would happen if a network already exists when using Ansible or any automation tool.
What if we wanted more than just one network to return? What does that look like? Let’s create a new playbook called “lk_next_network_more.yml” and pass in the “num” for the number of networks we want to return:
---
- hosts: nios
  connection: local
  tasks:
    - name: return the next 5 available network for network 10.10.0.0/16
      set_fact:
        networkaddr: "{{ lookup('nios_next_network', '10.10.0.0/16', cidr=24, num= 5, provider=nios_provider) }}"
        provider: "{{nios_provider}}"
    - name: check the networkviews
      debug:
        var: networkaddr
Let’s take a look at the results:
$ ap lk_next_network_more.yml

PLAY [nios] *****************************************************************************************************************

TASK [Gathering Facts] ******************************************************************************************************
ok: [192.168.0.200]

TASK [return the next 5 available network for network 10.10.0.0/16] *********************************************************
ok: [192.168.0.200]

TASK [check the networkviews] ***********************************************************************************************
ok: [192.168.0.200] => {
    "networkaddr": [
        "10.10.1.0/24",
        "10.10.2.0/24",
        "10.10.3.0/24",
        "10.10.4.0/24",
        "10.10.6.0/24"
    ]
}

PLAY RECAP ******************************************************************************************************************
192.168.0.200              : ok=3    changed=0    unreachable=0    failed=0    skipped=0    rescued=0    ignored=0
Ok, this is great, we got 5 networks, but notice, it skipped “10.10.5.0/24”. Remember, we created that one in the UI as well.
How Do You Create Networks Automatically Using nios_next_network?
Next, you will learn to use the “loop” inside of a playbook and we are going to use that to create networks. We are going to create a new file “create_a_new_network.yml” (again I’m not that creative with names). Most of it will look the same as above, but we added in “loop”. This will loop through the results and create the “network” using “state: present”.
---
- hosts: nios
  connection: local
  tasks:
    - name: return the next available IP subnet for network 10.10.0.0/16
      set_fact:
        networkaddr: "{{ lookup('nios_next_network', '10.10.0.0/16', cidr=24, provider=nios_provider) }}"
        provider: "{{nios_provider}}"
    - name: Print the subnet
      debug:
        var: networkaddr
    - name: configure a network ipv4
      nios_network:
        network: "{{ item }}"
        comment: this is a test comment
        state: present
        provider: "{{nios_provider}}"
      loop: "{{ networkaddr }}"
Take note of two things above, ”{{ item }}” and “loop: ”{{ networkaddr }}"". When we are looping through a simple output, it will always be ”{{ item }}” for each value returned. In our case, we only have one value. Additional information can be found here. Now, let’s run the script and see the results:
$ ap create_a_new_network.yml

PLAY [nios] **************************************************************************************************************************************************

TASK [Gathering Facts] ***************************************************************************************************************************************
ok: [192.168.0.200]

TASK [return the next available IP subnet for network 10.10.0.0/16] **********************************************************************************
ok: [192.168.0.200]

TASK [Print the subnet] ***************************************************************************************************************
ok: [192.168.0.200] => {
    "networkaddr": [
        "10.10.1.0/24"
    ]
}

TASK [configure a network ipv4] ******************************************************************************************************************************
changed: [192.168.0.200] => (item=10.10.1.0/24)

PLAY RECAP ***************************************************************************************************************************************************
192.168.0.200              : ok=4    changed=1    unreachable=0    failed=0    skipped=0    rescued=0    ignored=0
Line 19 from the output above shows that we see a change made to “NIOS” and the “item=10.10.1.0/24”. Let’s log into the UI and see the results:
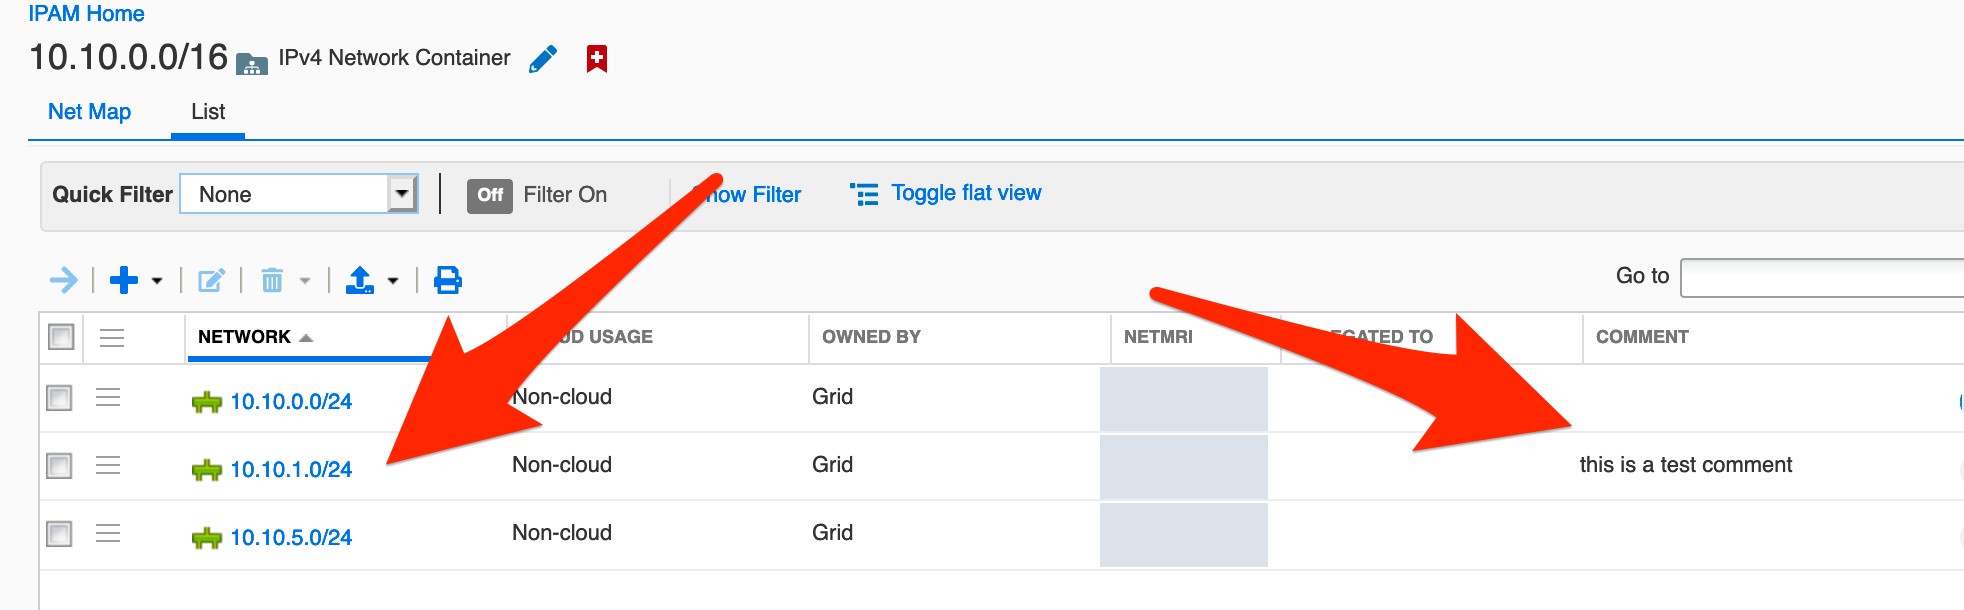
Ok, now let’s step this up a bit and create “5” networks at once. We are going to create a new playbook called “create_a_new_multi_network.yml”. This is very similar to the last script, but we are going to add “num” to the number of network addresses to return from network-container:
---
- hosts: nios
  connection: local
  tasks:
    - name: return the next 5 available IP subnet for network 10.10.0.0/16
      set_fact:
        networkaddr: "{{ lookup('nios_next_network', '10.10.0.0/16', cidr=24, num=5, provider=nios_provider) }}"
        provider: "{{nios_provider}}"
    - name: Print the subnet
      debug:
        var: networkaddr
    - name: configure a new IPv4 networks
      nios_network:
        network: "{{ item }}"
        comment: Adding new networks
        state: present
        provider: "{{nios_provider}}"
      loop: "{{ networkaddr }}"
For the example above, we are going to ask for the 5 “next_network” using “num=5”. Let’s run the playbook and see what we get:
$ ap create_a_new_multi_network.yml

PLAY [nios] **************************************************************************************************************************************************

TASK [Gathering Facts] ***************************************************************************************************************************************
ok: [192.168.0.200]

TASK [return the next 5 available IP subnet for network 10.10.0.0/16] ****************************************************************************************
ok: [192.168.0.200]

TASK [Print the subnet] **************************************************************************************************************************************
ok: [192.168.0.200] => {
    "networkaddr": [
        "10.10.2.0/24",
        "10.10.3.0/24",
        "10.10.4.0/24",
        "10.10.6.0/24",
        "10.10.7.0/24"
    ]
}

TASK [configure a new IPv4 networks] *************************************************************************************************************************
changed: [192.168.0.200] => (item=10.10.2.0/24)
changed: [192.168.0.200] => (item=10.10.3.0/24)
changed: [192.168.0.200] => (item=10.10.4.0/24)
changed: [192.168.0.200] => (item=10.10.6.0/24)
changed: [192.168.0.200] => (item=10.10.7.0/24)

PLAY RECAP ***************************************************************************************************************************************************
192.168.0.200              : ok=4    changed=1    unreachable=0    failed=0    skipped=0    rescued=0    ignored=0
Take a look at the results:
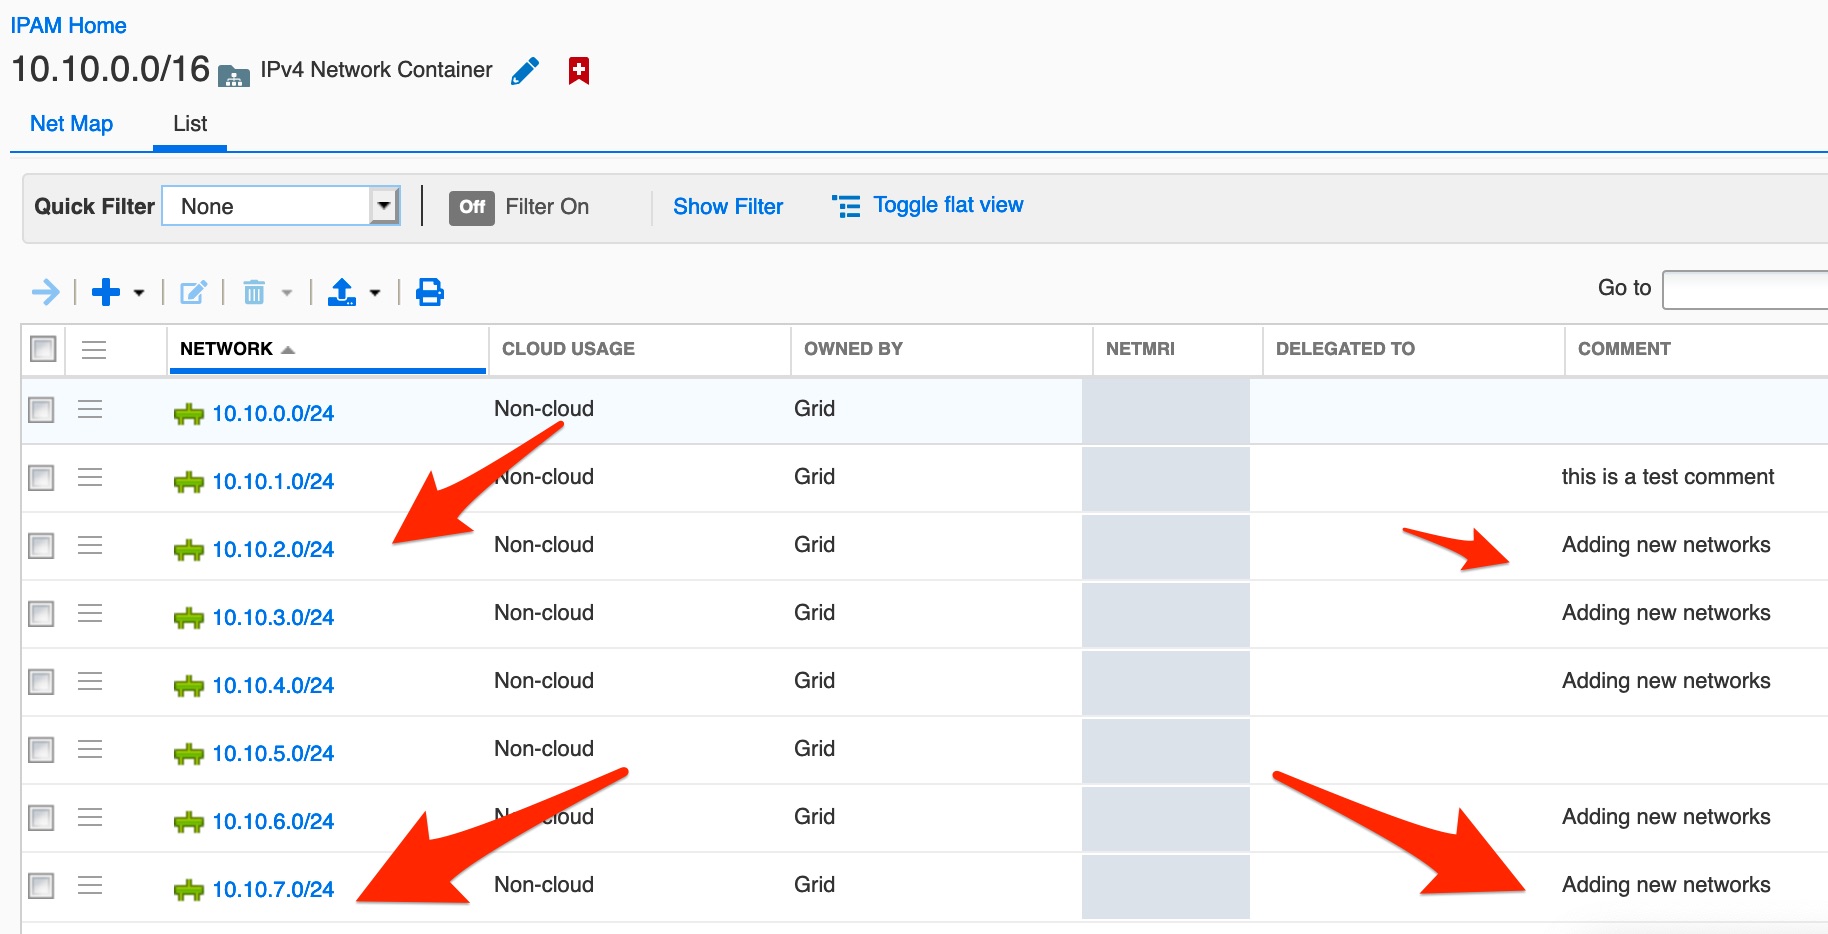
Notice, we skipped the “10.10.5.0/24” since that was created in the UI. We have some limitations with “num” due to “infoblox-client” API allowing max “20” calls.
What Are the Best Use Cases for nios_next_network in Ansible?
As you can see, it’s pretty interesting to use “loop” with “nios_next_network” to create multiple networks. You can also use this simple method to create a network if you didn’t want to use loops:
---
- hosts: nios
  connection: local
  tasks:
   - name: create network
     nios_network:
      network: 10.10.0.0/24
      network_view: ansibleNetView
      options:
        - name: domain-name
          value: sifbaksh.com
      extattrs:
        Site: DC 1
      comment: Created with Ansible
      state: present
provider: "{{ nios_provider }}"
The next post will be on using “nios_next_ip”, which will return the next available IP address for a network.
Recommended Reading
Ready to go further with Infoblox automation? These posts build directly on what you learned here:
- Infoblox and Ansible using “nios_next_ip” — Next in the series: grab the next available IP inside a network and auto-create host records.
- Infoblox and Ansible creating “DHCP Range” with “templates” — Take it further by creating DHCP ranges with Network Templates and auto-restarting services.
- Introduction to Infoblox API (WAPI) using Python — The same concepts, implemented in Python — great if you want to move beyond playbooks.
- The Ultimate Guide to Infoblox DDI WAPI Examples — Quick curl reference for DNS zones, DHCP scopes, and more.
Frequently Asked Questions
What is a Network Container in Infoblox and why is it required for nios_next_network?
A Network Container is a parent address block (e.g., 10.10.0.0/16) that holds child networks. The infoblox-client library looks specifically for a Container when nios_next_network is called — if the block isn’t defined as a container in NIOS, the lookup will return nothing.
How do you retrieve the next 5 available /24 networks from a container using Ansible?
Use nios_next_network with cidr=24 and num=5: networkaddr: "{{ lookup('nios_next_network', '10.10.0.0/16', cidr=24, num=5, provider=nios_provider) }}". Note that infoblox-client caps num at 20 calls per request.
How do you automatically create all returned networks in Infoblox using Ansible?
Pipe the networkaddr result into a nios_network task with state: present and loop: "{{ networkaddr }}". Ansible iterates over each returned network address and creates it in NIOS — a single playbook run handles all of them at once.
Comments
No comments yet — be the first to share your thoughts.