
Why Infoblox and Ansible
Infoblox delivers actionable network intelligence to enterprise, government, and service provider customers around the world, as the industry leader in DNS, DHCP, and IP address management (known as DDI). Ansible is one of the leaders in IT Automation.
What Will You Learn in This Infoblox and Ansible Series?
Over the upcoming weeks, I’ll be posting more about getting started with Ansible and Infoblox. I’ve had quite a few folks reached out to me asking for additional information around this integration, so I decided to do a series of blog posts around this. I myself am a beginner to Ansible, so please forgive my novice examples.
What I’m using:
- Ubuntu Linux running version 20.04
- Python3
- Ansible
- Infoblox VM/Appliance
How Do You Install Ansible for Infoblox Integration?
sudo apt update
sudo apt install software-properties-common
sudo apt-add-repository --yes --update ppa:ansible/ansible
sudo apt install ansible
Now, let’s check that Ansible is installed and running with Python 3:
$ ansible --version
ansible 2.9.2
  config file = /etc/ansible/ansible.cfg
  configured module search path = ['/home/sbaksh/.ansible/plugins/modules', '/usr/share/ansible/plugins/modules']
  ansible python module location = /usr/lib/python3/dist-packages/ansible
  executable location = /usr/bin/ansible
  python version = 3.7.6 (default, Jan 16 2020, 18:23:42) [GCC 9.2.1 20200110]
Next, we will need the Infoblox-Client for Python 3, which is what Ansible uses to connect to your Infoblox Grid via API (Application Programming Interface):
sudo apt install python3-pip
pip3 install infoblox-client
If you are running Python 2, and I’m not sure why you still are :), ignore the above and run the following:
sudo apt install python-pip
pip install infoblox-client
How Do You Create Your First Infoblox Ansible Playbook?
In your home directory, create a folder called ansible. Open your favorite editor in Ubuntu and create a file name “get_members.yml” and save it in the ansible folder.
---
- name: Infoblox get all Members
  hosts: localhost
  vars:
    nios_provider:
      host: gm.baksh.com
      username: admin
      password: infoblox
      wapi_version: 2.6.1
  connection: local

  tasks:
    - name: fetch all members
      set_fact:
        member: "{{ lookup('nios', 'member', provider=nios_provider) }}"

    - name: check the member
      debug:
        var: member
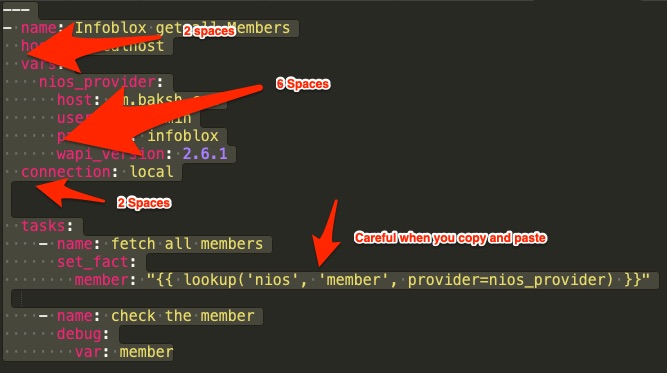
Let’s see the results:
sbaksh@ubuntu:~$ ansible-playbook get_members.yml

PLAY [baksh get all Members] ***************************************************************************************************

TASK [Gathering Facts] ************************************************************************************************************
ok: [localhost]

TASK [fetch all members] **********************************************************************************************************
ok: [localhost]

TASK [check the member] ***********************************************************************************************************
ok: [localhost] => {
    "member": [
        {
            "_ref": "member/b25lLnZpcnR1YWxfbm9kZSQw:gm.baksh.com",
            "config_addr_type": "BOTH",
            "host_name": "gm.baksh.com",
            "platform": "baksh",
            "service_type_configuration": "ALL_V4"
        },
        {
            "_ref": "member/b25lLnZpcnR1YWxfbm9kZSQz:m1.baksh.com",
            "config_addr_type": "BOTH",
            "host_name": "m1.baksh.com",
            "platform": "VNIOS",
            "service_type_configuration": "ALL_V4"
        },
        {
            "_ref": "member/b25lLnZpcnR1YWxfbm9kZSQ0:m2.baksh.com",
            "config_addr_type": "BOTH",
            "host_name": "m2.baksh.com",
            "platform": "VNIOS",
            "service_type_configuration": "ALL_V4"
        },
        {
            "_ref": "member/b25lLnZpcnR1YWxfbm9kZSQ3:m3.baksh.com",
            "config_addr_type": "IPV4",
            "host_name": "m3.baksh.com",
            "platform": "VNIOS",
            "service_type_configuration": "ALL_V4"
        },
        {
            "_ref": "member/b25lLnZpcnR1YWxfbm9kZSQxMg:rpt.baksh.com",
            "config_addr_type": "IPV4",
            "host_name": "rpt.baksh.com",
            "platform": "baksh",
            "service_type_configuration": "ALL_V4"
        },
        {
            "_ref": "member/b25lLnZpcnR1YWxfbm9kZSQzMQ:pt1400.baksh.com",
            "config_addr_type": "IPV4",
            "host_name": "pt1400.baksh.com",
            "platform": "baksh",
            "service_type_configuration": "ALL_V4"
        },
        {
            "_ref": "member/b25lLnZpcnR1YWxfbm9kZSQzMg:gm1nicons.baksh.com",
            "config_addr_type": "IPV4",
            "host_name": "gm1nicons.baksh.com",
            "platform": "VNIOS",
            "service_type_configuration": "ALL_V4"
        },
        {
            "_ref": "member/b25lLnZpcnR1YWxfbm9kZSQzMw:gm1p1.baksh.com",
            "config_addr_type": "IPV4",
            "host_name": "gm1p1.baksh.com",
            "platform": "VNIOS",
            "service_type_configuration": "ALL_V4"
        },
        {
            "_ref": "member/b25lLnZpcnR1YWxfbm9kZSQzNA:gm1p2.baksh.com",
            "config_addr_type": "IPV4",
            "host_name": "gm1p2.baksh.com",
            "platform": "VNIOS",
            "service_type_configuration": "ALL_V4"
        },
        {
            "_ref": "member/b25lLnZpcnR1YWxfbm9kZSQzNQ:gm1p3.baksh.com",
            "config_addr_type": "IPV4",
            "host_name": "gm1p3.baksh.com",
            "platform": "VNIOS",
            "service_type_configuration": "ALL_V4"
        },
        {
            "_ref": "member/b25lLnZpcnR1YWxfbm9kZSQ0Ng:gmc.baksh.com",
            "config_addr_type": "BOTH",
            "host_name": "gmc.baksh.com",
            "platform": "VNIOS",
            "service_type_configuration": "ALL_V4"
        },
        {
            "_ref": "member/b25lLnZpcnR1YWxfbm9kZSQ1NA:tempgmc.baksh.com",
            "config_addr_type": "BOTH",
            "host_name": "tempgmc.baksh.com",
            "platform": "VNIOS",
            "service_type_configuration": "ALL_V4"
        },
        {
            "_ref": "member/b25lLnZpcnR1YWxfbm9kZSQ1NQ:tempgmc2.baksh.com",
            "config_addr_type": "BOTH",
            "host_name": "tempgmc2.baksh.com",
            "platform": "VNIOS",
            "service_type_configuration": "ALL_V4"
        }
    ]
}

PLAY RECAP ************************************************************************************************************************
localhost                  : ok=3    changed=0    unreachable=0    failed=0    skipped=0    rescued=0    ignored=0
This will give you all of the members connected to your grid. The next steps will be to configure the Ubuntu host to use the /etc/ansible/hosts file and some other variables.
A future blog post will cover using lookups, next_ip, next_network, etc. Also, please comment on additional topics that you want to see demonstrated/explained.
Files are located here: GitHub
Next post in this series: Infoblox and Ansible Getting to know Lookup
Frequently Asked Questions
What Python package does Ansible need to communicate with Infoblox?
Ansible relies on the infoblox-client Python package to communicate with the Infoblox Grid Master via the WAPI. Install it with pip3 install infoblox-client for Python 3 (or pip install infoblox-client for Python 2, though Python 2 is no longer recommended).
What does the first Infoblox Ansible playbook in this series do?
The first playbook (get_members.yml) uses the nios lookup module to connect to the Infoblox Grid Master and return a list of all member appliances — including each member’s _ref, host_name, platform, and service_type_configuration.
How do you specify Infoblox credentials in an Ansible playbook?
Credentials are defined under a vars block as a nios_provider dictionary with host, username, password, and wapi_version. The next post in the series moves these to group_vars/nios.yml to avoid hardcoding secrets in each playbook file.
Comments
No comments yet — be the first to share your thoughts.